|
Now that I've finished my press, it's hard to know what to do first! I think I'm an experimenter at heart. I keep wondering what will happen if I use this paint, or that ink or this paper or that technique and I just have to try it! I have two piles of paper now. The "Doesn't Work and Never do that Again" pile and the "Would Work if I Slowed down and did it Properly" pile. The "Doesn't Work" pile contains all my experiments with oil paints and acrylics which I did before I decided to just go out and get some etching ink. I have learned there's a reason printmakers use printmaking materials! I've wanted a printing press for quite a while but what really drove me to make one was seeing collagraphs. Not the kind kids do in school with macaroni, but the kind done by Kim Major-George and Lynn Bailey . I love the idea that you can just glue little scraps of cardboard and whatnot to more cardboard and come up with such intriguing prints. Here's my plate; everything is glued to a piece of mat board: 
I used a cereal box for the houses and the wheels, sandpaper for the sail, string, sequins and pepper. For the hull of the boat I scratched out a layer of the mat board. This was a mistake because the hull in the final print was always too light. That stuff which looks like dirt is actually pepper. Lynne Bailey, in her collagraph how-to video talks about something called "carborundum". I didn't have any of that, but I improvised with pepper. Everything is well glued down with mat medium and then a couple of coates of varnish are applied. I like to varnish the back as well to keep it from bending and make it easier to clean. When I varnished to back I left the plate to dry on some paper and the varnish dripped onto the front and stuck to the paper. I couldn't get it off and it left those blobs in the lower and upper right corners. Being in a rush to try this, I carried on. I don't really mind the look it created. Black etching ink is applied once everthing is dry and then the excess is wiped off. If you want to try this, watch Lynn Bailey's vimeo. She shows how to do this much better than I can explain. I used Stonehenge paper which which was soaked for several hours and then blotted dry with newsprint so that it was damp but not wet. Here's the resulting print. 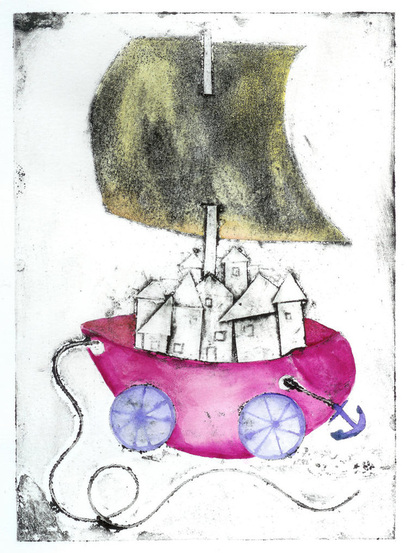
I'm so excited by this effect! It looks kind of old and worn. I hand tinted the coloured parts with watercolour. I can't wait to try some more. About the Press The Black and White Press is working amazingly well for something constructed my me. It uses an 8 ton hydraulic car jack and I have learned that this can exert too much pressure. I've actually cracked a piece of plexiglass, but no harm came to the press itself. If anyone is interested in building one, I made a substitution for the complicated ramming cup. The ramming cup is the part the jack pushes against when you start pressing. The ramming cup required that you bend metal. Bending metal sounded way too difficult to me, so I searched the hardware store and found this perfect thing! 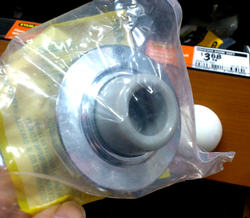
Never before has anyone been so happy to find a doorstop! That rubber part is not attached. Take that out and it makes a perfect ramming cup. The jack head fits perfectly into the round ring and the metal plate at the back even has holes so you can easily screw it on.
If anyone has any questions about the press feel free to ask!
2 Comments
Ann Mackay
1/26/2013 10:29:27 pm
What a great result! The print is lovely and the press obviously works well. It was very interesting to see how you'd built up your printing plate and to read how you'd modified the press.
Laurel
1/27/2013 05:15:37 am
Thanks Ann! Leave a Reply. |
 [email protected]  © Laurel Martin 2010
|
 RSS Feed